

The setting up of electronic hardware and software is something that many people are very scared of, wrongly assuming it’s a task that only dedicated technicians or the always present tech savvy relatives are able to perform, with a constant and unfounded dread of damaging the whole apparatus only by pressing one wrong key; when in fact there are always (very simple) ways to reverse almost any type of wrong doings.
The successful setup of a wireless router is one of such tasks that particularly scare the average common-folk. In reality, accomplishing this is actually very easy, and it doesn’t necessarily take a lot of steps to complete the process. Unless of course, you’re one of those “tech savvy” people that like to take things further. Fortunately for you, this how-to tutorial is especially tailored to the least experienced of individuals.
To lift moods up a little bit, keep in mind router manufactures are regularly making it easier for non-technical users to put together what were otherwise difficult home networks. In the case of routers, the newer ones come with semi-automatic installing processes, labeled and color-coded ports, and a very useful reset button. Furthermore, lately networking manufactures offer mobile and tablet apps that can be used for first-time installation and consequent tweaking.
Hopefully with this pep-talk you’ve laid all your fears to rest, and are finally up to the challenge. Let’s start!
Step 1. Hardware setup
In this step the objective is to connect your router to your modem and laptop or PC. To make it possible, you must have at hand the following items:
- A working computer with an Ethernet port (most computer have one).
- A modem (cable, fiber, or DSL) that is already set up and working properly.
- 2 Ethernet cables.
- A router (obviously).
Before delving into the installation, let’s quickly go over the anatomy of a router, specifically, its network ports.
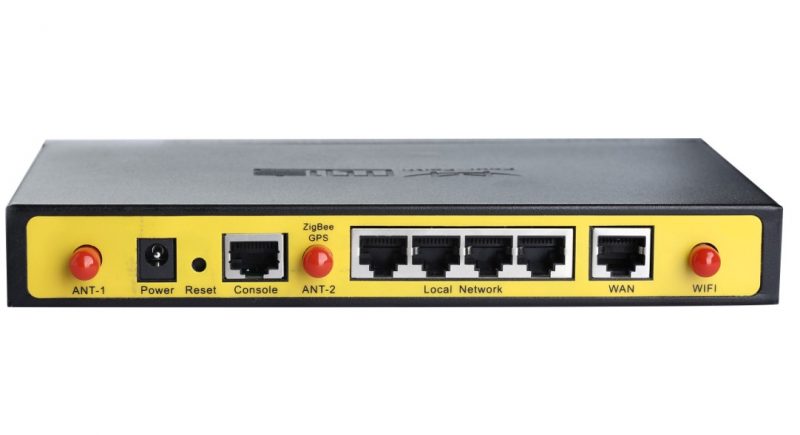
Generally, most routers have 5 Ethernet ports, 4 of which are LAN (local area network) ports, and another called WAN (wide area network) port. The shape of all 5 ports is exactly the same, but the WAN port is almost always a different color and separated from the rest. In the picture shown, the LAN ports are yellow with numbers 1-4 on them, while the WAN port is blue and aptly labeled “WAN”, although other common names are “Internet”, “Line”, and “DSL”. The WAN port connects the router to the modem, and thus, to the internet, and the LAN ports connect local devices.
Before starting the hardware process, it’s important to stress that neither the modem nor the router should be unplugged from the power supply. Now that that’s settled, we can head straight to what you really came here for.
- Using one the Ethernet cables, connect the router’s WAN port to the modem (cable, fiber, or DSL).
- With the remaining Ethernet cable connect any of the router’s LAN ports to your laptop of PC.
- Plug the router into the power outlet, as well as the modem. Wait 1 or 2 minutes.
Task no. 1 accomplished. You’ve successfully finished the hardware setup.
Step 2. Access the web interface
Knowing how to enter the router’s web interface is the key to any changes or tweaks you may want to apply to configure your router.
- Find out what the router’s IP address is. If it’s a new one, the IP address should be pointed out somewhere in the user manual that come with the box. Most home routers have very similar IP addresses, with only one or two different digits. The standard one is 192.168.x.1, where the x can either be 0, 1, 2, 3, 10, or 11.
- Enter the IP address in the web browser of your preference.
- The router’s login screen will shortly appear, and to access a username and a password must be entered. Generally, the default username is admin, and the password can be admin, password, default, or 1234. Again, the user manual always provides this information as well.
Task no. 2 accomplished. You’ve successfully accessed the web interface.
Step 3. Apply basic setup settings
As beginners, the only thing that matters to us is changing the default setting log-in information, and activating your Wi-Fi.
To change the log-in information:
- In every router’s web interface, there’s always a setup menu, it’s very easy to spot. After you locate it, head straight to any option whose name can relate to any of the following: administration tools, system tools, or tools section.
- Look for any option that reads password, or admin password, and click it.
- Once there, you can choose your new log-in username and password.
To activate your Wi-Fi:
- With the same setup menu, locate the option that says Wireless Settings, Wi-Fi, or the likes, and click it.
- In the box labeled SSID, enter the name you want for your wireless network.
- In the security settings, chose WPA-PSK/ WPA2-PSK as security type. That right there is banking-grade encryption. Do not choose WEP encryption.
- Finally, type in a password of your choosing, preferably a difficult one, with numbers, letters, and symbols. Don’t forget to store this information in a safe place.
- Click Save. After this, the computer will automatically close your web browser, and disconnect from the internet.
- Look for the wireless networking icon in your task menu, click it, and enter your Wi-Fi’s username and password.
Task no. 3 accomplished. You’ve successfully set up your Wi-Fi network.
And voila! You can now freely access the web via Wi-Fi connection, without the help of anybody in 3 easy steps.
How useful was this post?
Click on a star to rate it!
Average rating / 5. Vote count: